
This users’ manual describes version 2 of the Quality Control Web Application.
Introduction
The PhenoDCC Quality Control web application allows a user to visualise phenotype data collected from various research institutes, and to identify and discuss possible quality control issues with the data before they are signed-off for further scientific analysis.
Target users
The quality control web application was designed primarily for 1) data managers at the various participating research centres carrying out the phenotyping experiments and producing the data, and 2) for the data wranglers who are responsible for identifying and raising quality control issues with the data. Using this web application, both the data managers and data wranglers can discuss any quality control issues inside the same platform, allowing quicker turn-around time for resolving issues. Furthermore, other users can also see the progress of the data, as they are submitted by the phenotyping centres.
Accessing the web application
The PhenoDCC web application is accessed using a standard web browser, such as Google Chrome, by visiting the appropriate server. Once the application has been loaded, the web app is ready for usage. Depending on the internet connection speed, loading the web application may take a while. While the application is being loaded, you will see the following screen on your browser.
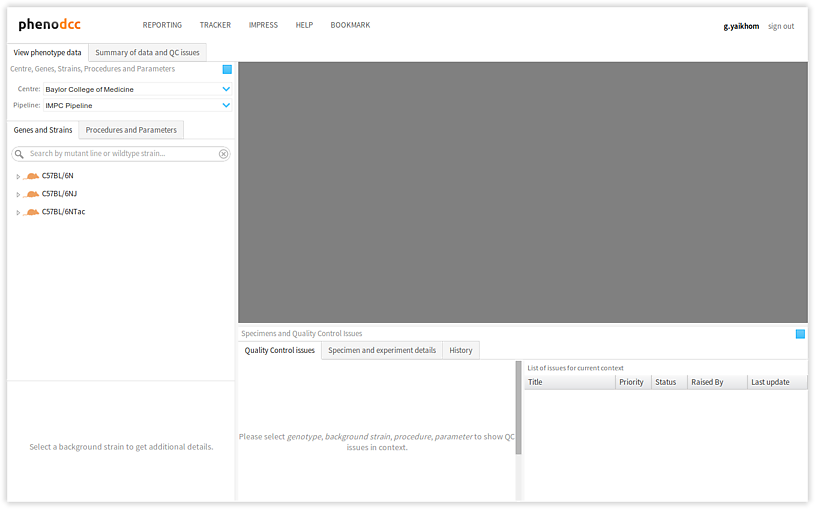
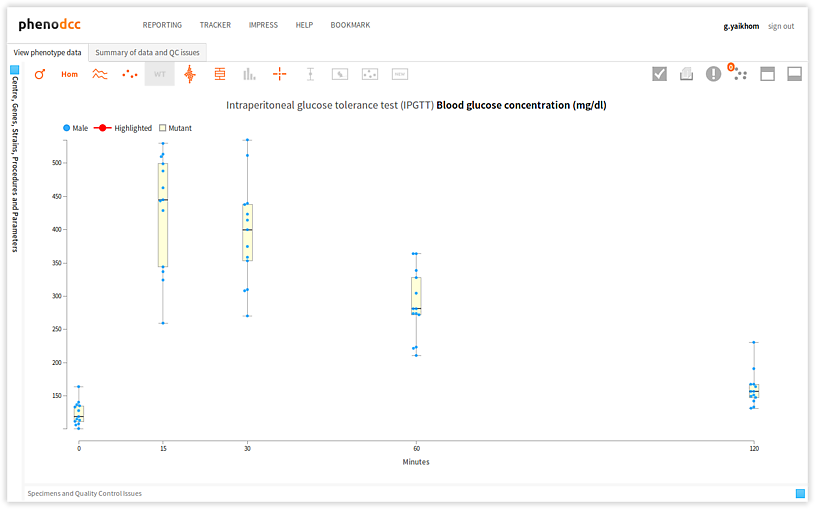
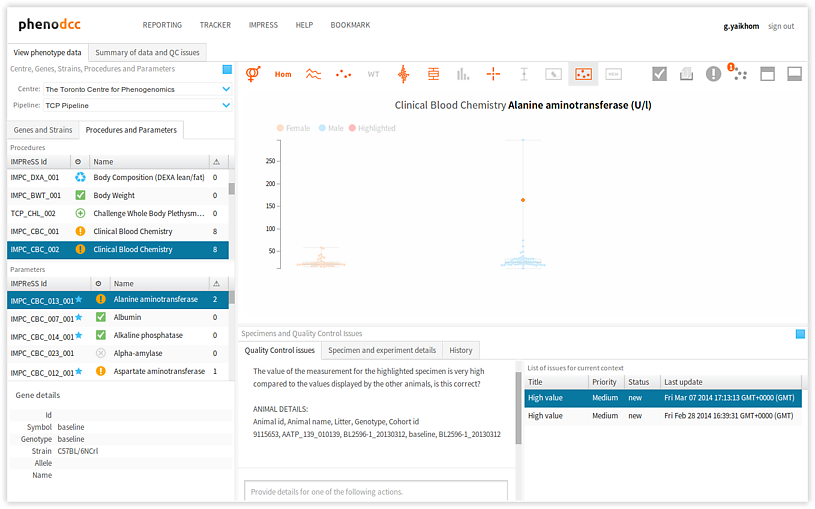
Once the application has been loaded, you will see the following screen on your browser.
The overall process
In order to visualise phenotype data, we must specify the context which selects the required data that we wish to analyse. This is referred to as the data context. In the PhenoDCC web application, a data context is defined by the following variables:
- Centre The centre that was responsible for experimenting and
collecting the phenotype data. This variable is named
cidin the data context. - Pipeline The phenotyping pipeline under which the procedures
were carried out. This variable is named
lidin the data context. - Genotype The genotype that is associated with the mouse specimens
on which the experiments were carried out. This variable is named
gidin the data context. - Background strain The specific background strain of the selected
genotype. This variable is named
sidin the data context. - Procedure The type of experimental procedure that was carried out
on the selected specimens. This variable is named
peidin the data context. - Parameter While carrying out an experimental procedure, various
results and observations are recorded using the standard operating
protocols (SOP) defined in IMPReSS. Each of these results are
recorded under a well defined parameter. This variable is named
qeidin the data context.
Once the data context is defined, the PhenoDCC web application will display the required visualisation of the available data, or alert the user if no visualisation could be rendered. In fact, it is possible to start the PhenoDCC web application using a given data context (see Initialising the web application).
Components of the user interface
The user interface for the PhenoDCC web application is divided into several visual components. Each of these corresponds to a clearly defined function. The icons are explained in Understanding the icons section.
Toolbar, centre, genes and strains
- Toolbar The toolbar allows the user to navigate to other related web applications, such as the tracker. It also provides interfaces for signing in, or signing out.

- Centre selector The centre selector is a drop-down menu which
lists all of the participating centres that are producing
phenotype data. Selecting the centre is the first step of
specifying a data context. The contents of the genes/strains panel,
discussed below, depends on the centre selected here. Selecting a
centre alters the data context by updating the centre (
cid).

- Pipeline selector The pipeline selector is a drop-down menu which
lists all of the pipelines that are associated with the selected
centre. Selecting the pipeline is the next step of specifying a data
context. The contents of the genes/strains panel and the procedures
panel depend on the selected pipeline. Selecting a pipeline alters
the data context by updating the pipeline (
lid). - Genes/strains search box The genes/strains search box allows a user to search for specific genes, or background strains. The search is case-insensitive and interactive, as it triggers as soon as the text in the search box is altered. The search returns items where the genotype or background strain matches the searched string, both partially or completely. The results of the search are displayed in the genes/strains panel, discussed below. In fact, this search box acts as a filter for the genes/strains panel.
- Genes/strains panel The genes/strains panel displays a list of
genotypes and corresponding background strains. Clicking on a
genotype expands (or contracts) the list of background strains
associated with it. Clicking on a background strain alters the data
context by updating the genotype (
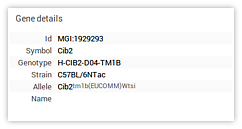
gid) and background strain (sid). The genes/strains search box, discussed above, can be used as a filter to trim this list. - Data context details The data context details panel displays information relevant to the currently active data context.
Procedures, parameters and specimens

- Procedures panel The procedures panel lists all of the experimental
procedures defined in the IMPReSS database. Clicking on a panel
item alters the data context by updating the procedure id
(
peid). Furthermore, this also triggers an update of the parameters panel, which only list parameters that are associated with the selected procedure, and also the specimens panel, which list all of the mouse specimens on which the procedure was carried out. - Parameters panel The parameters panel lists all of the parameters
that are associated with a procedure. These parameters are defined in
the IMPReSS database. Clicking on a panel item alters the data
context by updating the parameter id (
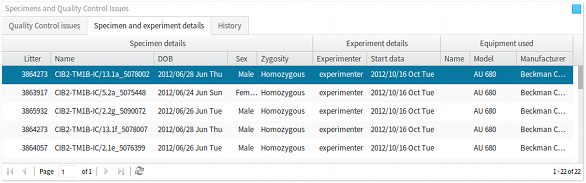
qeid). The list of parameters displayed in this panel depends on the procedure selected in the procedures panel, as discussed above. - Specimens panel The specimens panel lists all of the mouse specimens on which a procedure was carried out. Further to the specimen details, such as data-of-birth, sex, zygosity etc., this panel also displays details concerning the experimenter, experiment date, and the equipment that was used to carry out the procedure and record the results and observations. As discussed above, the list of specimens displayed in this panel depends on the procedure selected in the procedures panel.
Quality control issues and actions
- Issues panel The issues panel lists all of the quality control issues that have been raised in the current data context. This panel provides information, such as brief summary, priority, status etc., that are relevant to studying, discussing and resolving a quality control issue. When an issue is selected, all of the data points that are associated with the issue are highlighted in the visualisation, as discussed below. Furthermore, selecting an issue updates the list of associated actions in the actions panel, also discussed in the following section.
- Actions panel The actions panel lists all of the actions that are associated with an issue. There are several types of actions, some of which are raising an issue, commenting on an issue, and resolving an issue. The actions panel gets updated when an issue is selected in the issues panel. The actions panel also contains the interface for commenting on an an existing issue (see Commenting on issues).
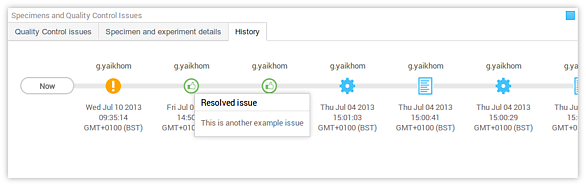
- History panel The history panel displays a timeline that provides an overview of what has been happening to the data context. It begins when there was no data available for that context, until the most recent activity on that context. Each activity, for example, data upload, removal or modification; or issue creation and resolution, etc. are recorded and displayed in this timeline. The icons are explained in Understanding the icons section.
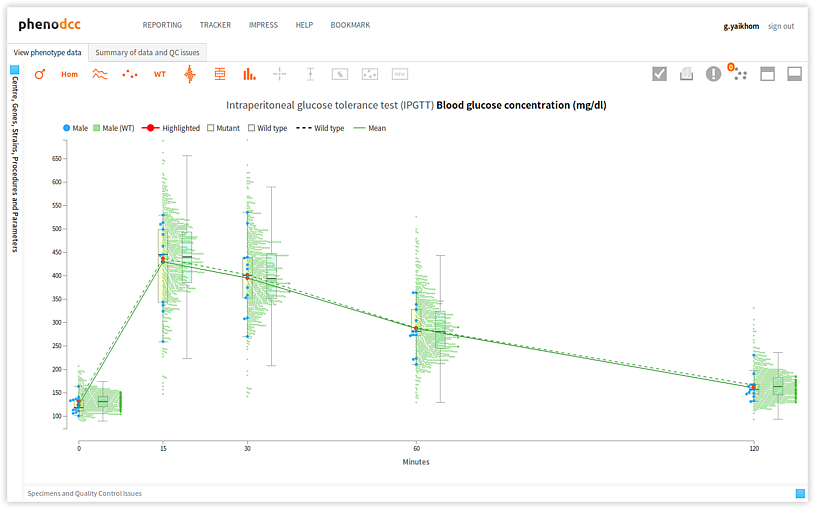
Visualisation and controls
- Visualisation The visualisation is the most important component of the PhenoDCC quality control web application. This is where the data is visualised as interactive graphs, charts, and more. This is where a user can get further details about a specific data point, and also select data points for raising quality control issues. We shall discuss the visualisation components in detail in later sections.

- Visualisation controls The visualisation controls is a context-sensitive panel that displays a collection of items that control the manner in which the data is visualised. For instance, it allows a user to interactively include, or discard, certain visual details from the visualisation, thus enhancing the analysis. We shall discuss the specific functions of each of the control items in detail in later sections.
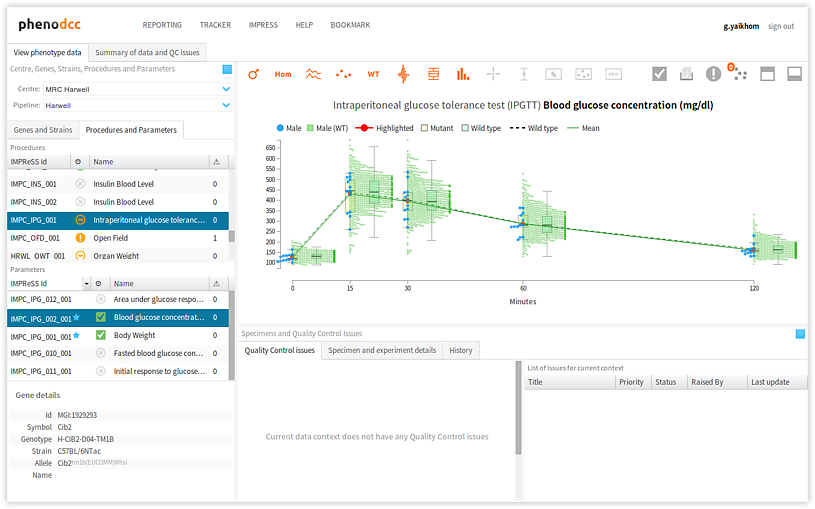
Visualise phenotype measurements
To visualise phenotype measurements, specify the data context by selecting the following:
- Select a centre. This will update the genes/strains panel, and will lists only those genotypes and background strains pertinent to the centre just selected.
- Select a pipeline. This will update the genes/strains panel, and will lists only those genotypes and background strains pertinent to the pipeline just selected.
- Search for a specific genotype, or background strain. This will filter the list of genotypes and background strains in the genes/strains panel.
- Select a background strain from the list. This will update the data context details panel.
- We must now select the procedures and parameters, but before we do that, we must first activate the procedures/parameters panel. To do this, click on the Procedures and parameters tab, as shown above.
- Select the procedure that we wish to investigate. This will update the list of parameters in the parameters panel.
- Select the parameter that we wish to analyse. This completely defines a data context. If there are data available for this context, these will now be displayed in the visualisation panel.
Visualisation controls
Maximise/minimise visualisation
Clicking on the  button maximises the visualisation by hiding the Centre, Genes, Strains, Procedures and Parameters panel; and the Specimens and Quality Control Issues panel. This is shown below. If the visualisation is already maximised, the control has no effect.
Clicking on the  button minimises the visualisation by showing the Centre, Genes, Strains, Procedures and Parameters
panel; and the Specimens and Quality Control
Issues panel. This is shown below. If the visualisation is
already minimised, the control has no effect.
button minimises the visualisation by showing the Centre, Genes, Strains, Procedures and Parameters
panel; and the Specimens and Quality Control
Issues panel. This is shown below. If the visualisation is
already minimised, the control has no effect.
Using the cross-hair

If the Cross-hair control is checked, the visualisation will display a cross-hair with two line segments, one vertical and the other horizontal, so that they intersect at the location of the mouse pointer. When the user moves the mouse cursor over the visualisation, the cross-hair will interactively update to reflect the mouse movement. A cross-hair makes it easy to view the data points relative to the x and y axes, and also allows a user to check if certain data points have similar values.
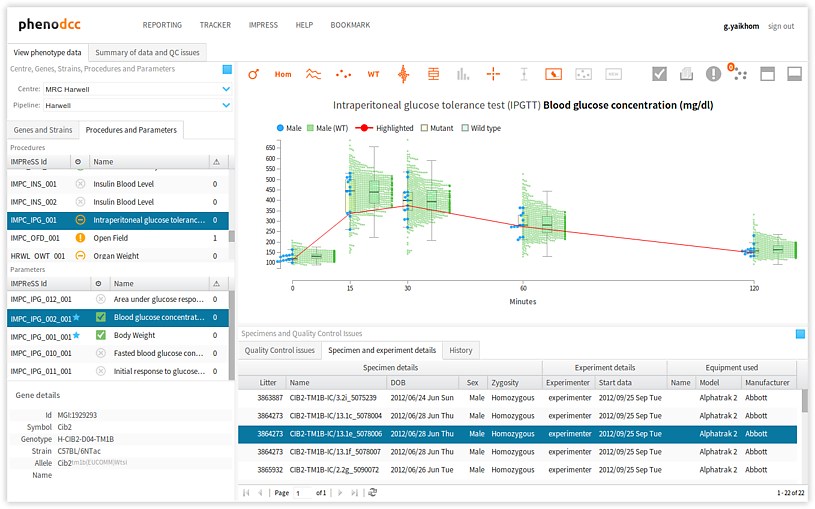
Highlighting specimen data-points

To highlight the data points that correspond to a specific specimen, activate the Highlight specimen control and simply select the required specimen from the Specimen and experiment details panel. The visualisation will refresh, and the data-points that correspond to the specimen will be highlighted. This is shown below.
Getting data point details
Hovering over a data point will pop-up an information box that displays further details about the data point, as shown below. The icons are explained in Understanding the icons section.
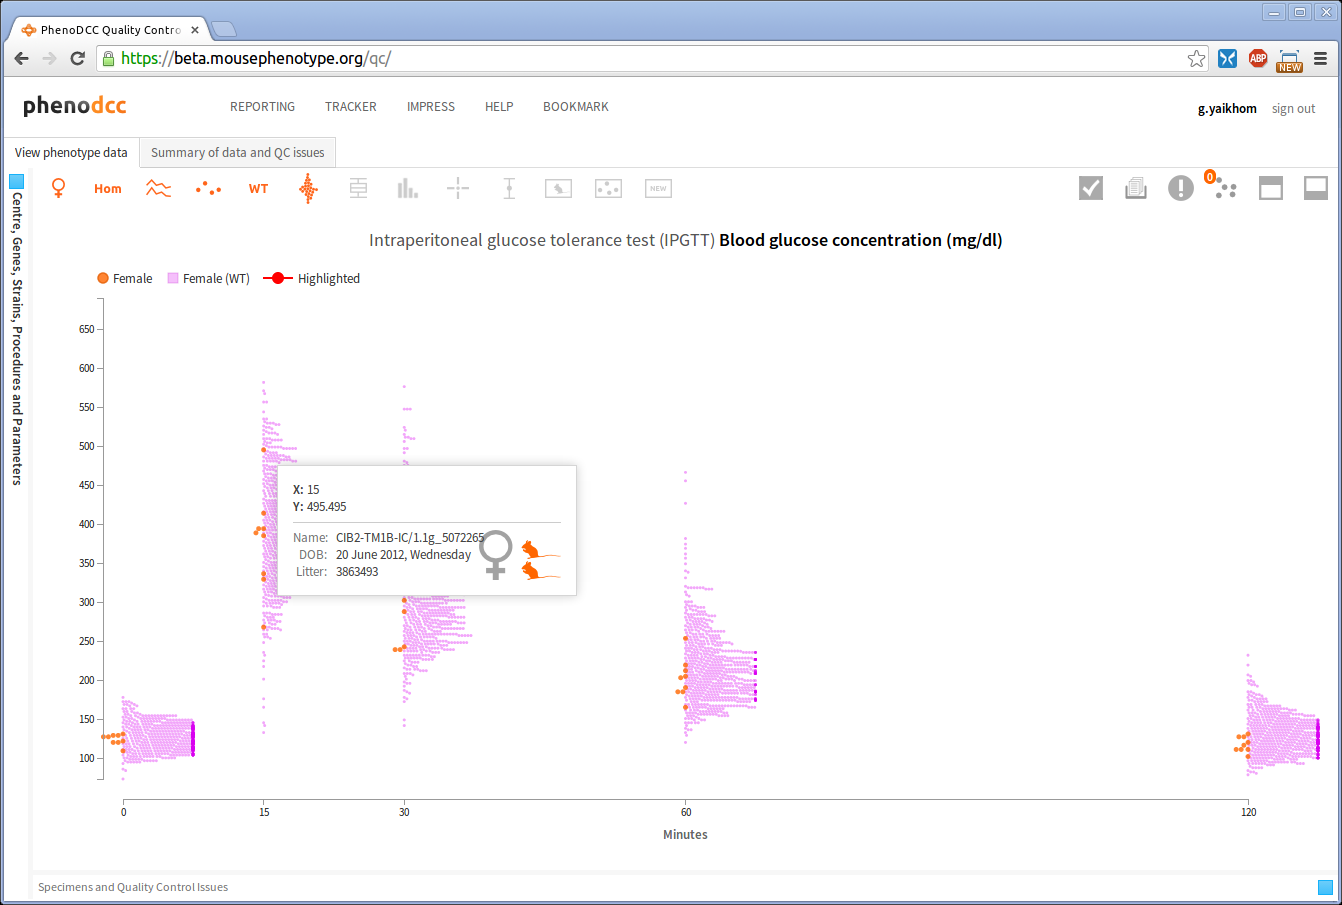
The placement of the information box depends on the position of the mouse pointer over the visualisation. The web application will ensure that it is always displayed inside the visible region. By default the information box is displayed in the 4th quadrant relative to the mouse position, as this makes reading the details easier. However, if such a placement is not possible, the web application will automatically choose an appropriate alternative placement.
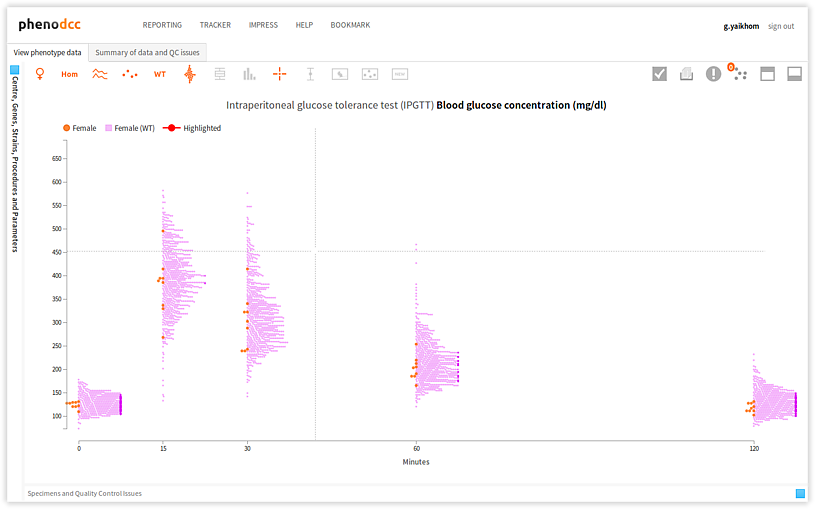
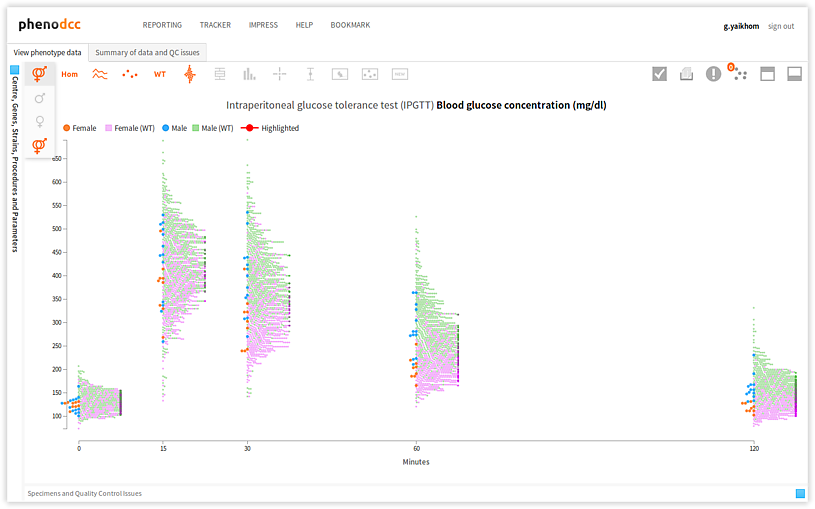
Filter data points by sex

Checking the Show both male and female datapoints control displays all of the data points that are associated with all of the specimens listed in the Specimen and experiment details panel.
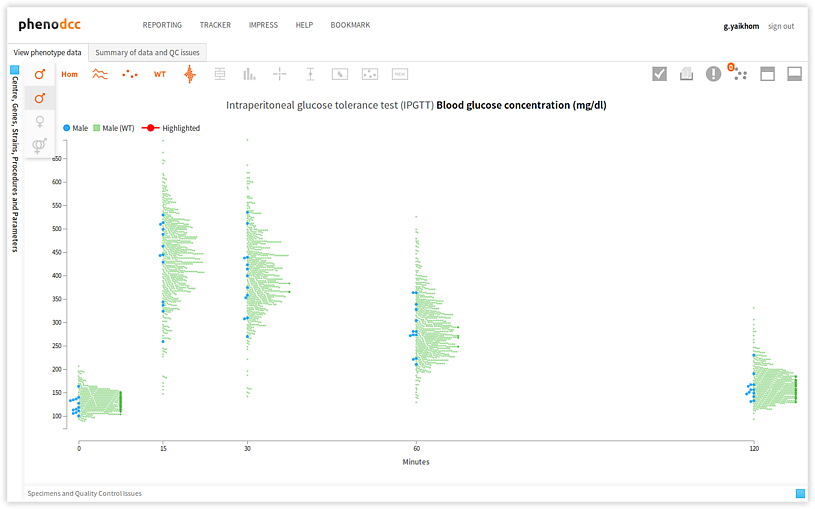
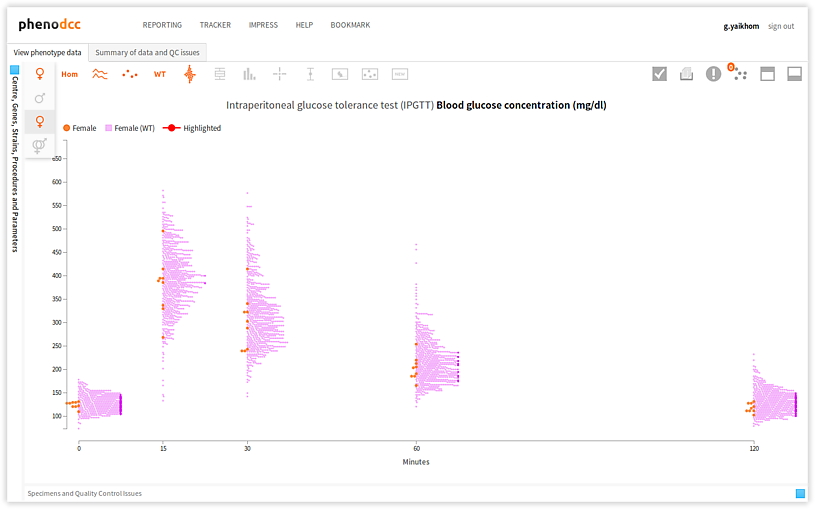
By checking or unchecking the Include only male  , or Include only female
  controls, a user can filter out data points by sex. These are shown below.
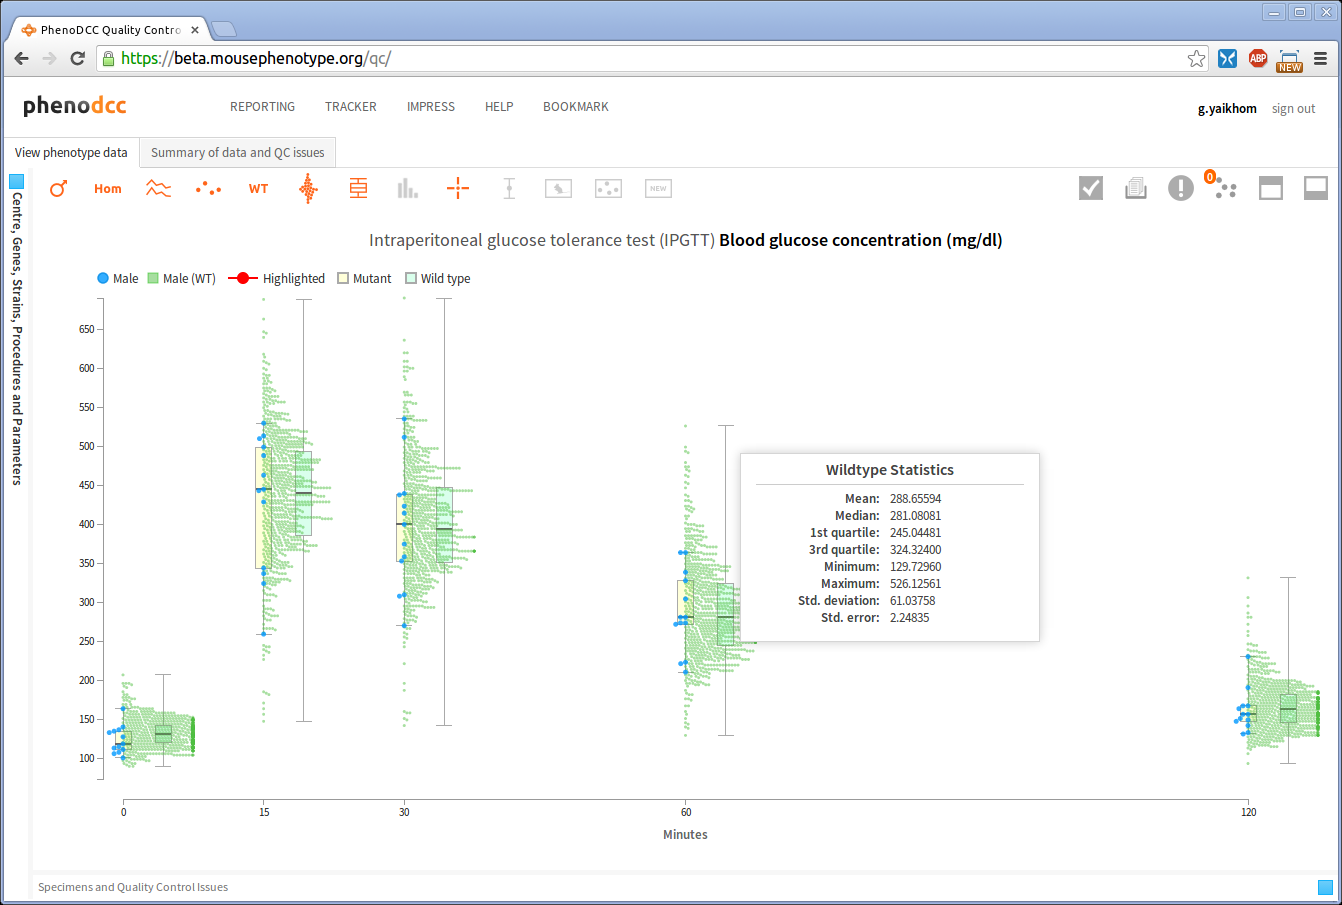
Visualising statistical information

The PhenoDCC web application allows a user to visualise statistical information about the data points. Statistical visualisation is enabled by checking the Show statistics control . The list of all statistics that may be included is listed in the Visualisation control icons section.
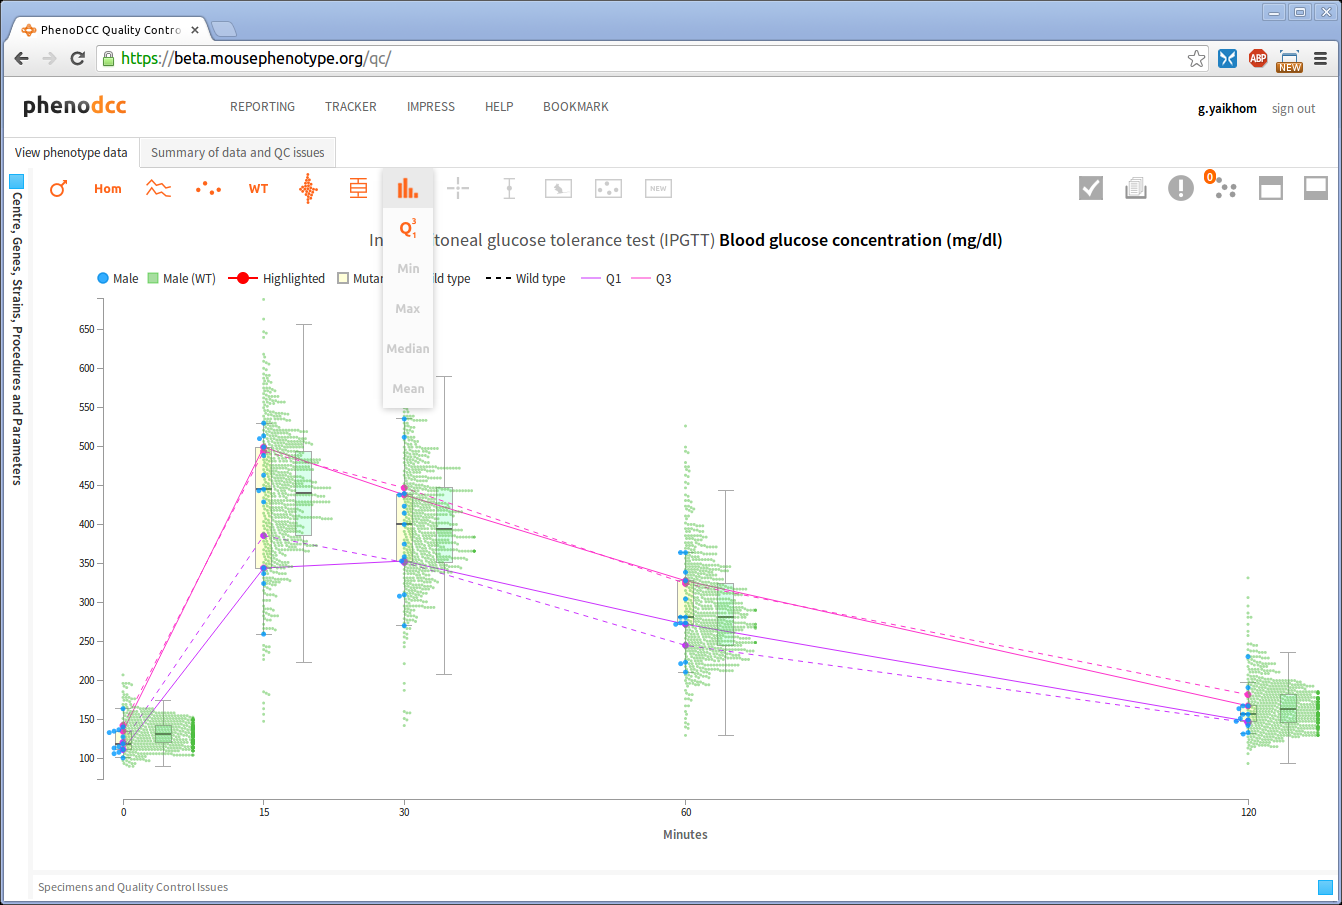
The above screen-shot shows an example statistical visualisation, which displays the first and third quartiles for all the data sets (grouped by x-axis values).
It is possible to show, or hide, the data point circles and the series
polyline by checking, or unchecking, the Show data point  and Show series
polyline
and Show series
polyline  controls
respectively.
controls
respectively.
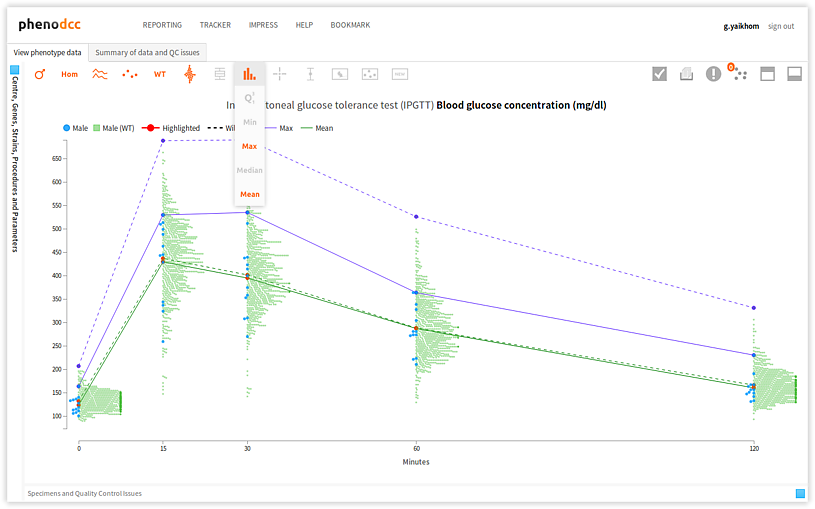
Maxima, minima, mean, median and quartiles
It is possible to combine several statistical information to render a combined visualisation, as shown below.
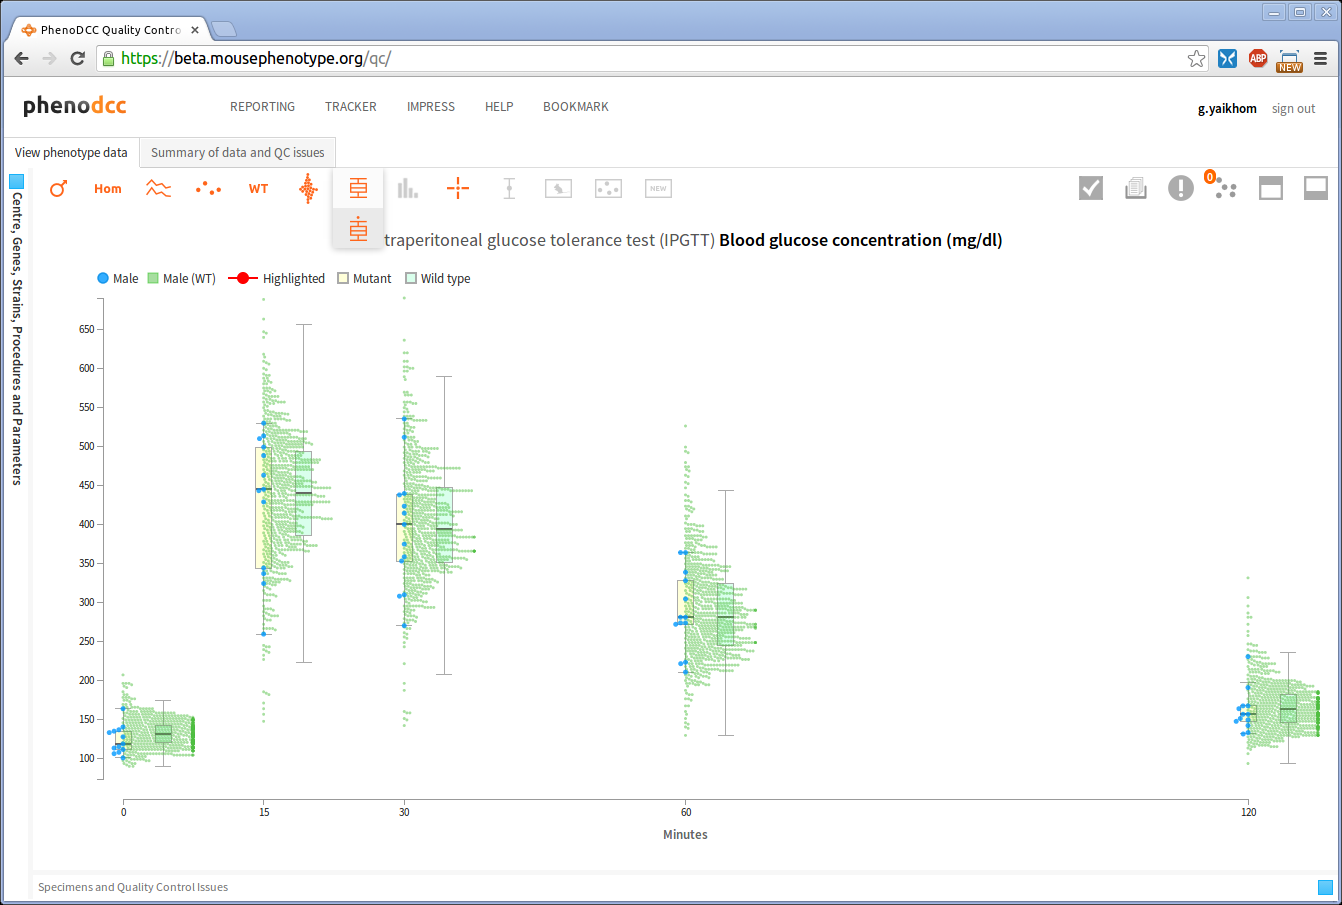
Box-and-Whisker plots

A box-and-whisker plot allows visualisation of the quartiles and regions that are either within 1.5 times the inter-quartile range (IQR), or the range. This can be enabled by checking the Box-plot with whiskers control.
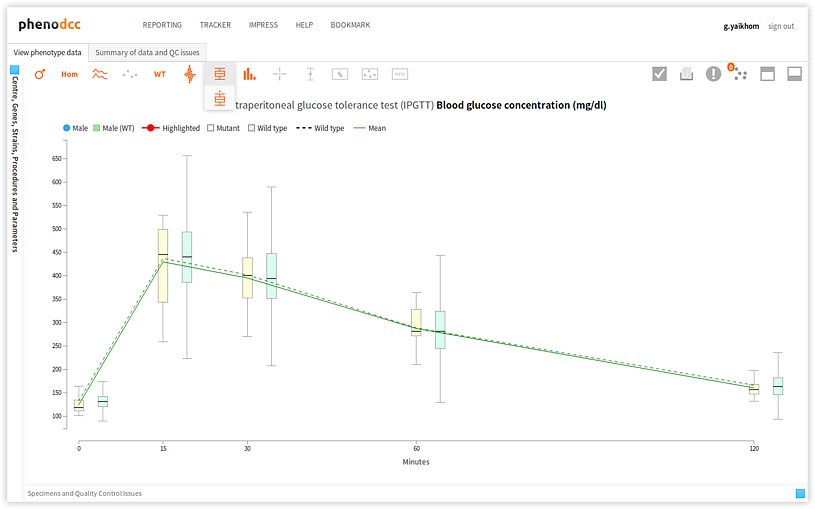
There are two choices for specifying how far the whiskers are extended. These are:
- Extend to show the range, in which case the lower whisker extends to the minima, and the upper whisker extends to the maxima.
- Extend 1.5 times the inter-quartile range, in which case the lower
whisker extends 1.5 x IQR below the first quartile, and the upper
whisker extends 1.5 x IQR above the third quartile. To do this, enable
the
 control.
Show/hide wildtype statistics

To show or hide visualisation of wildtype datapoints and their corresponding statistical information, enable or disable the Include wildtype control . If enabled, this will first scale the y-axis to fit the wildtype data points, and then show the related statistical information.
Quality control issues
The ability to raise an issue is one of the main facilities provided by the PhenoDCC quality control web application. By allowing a user to raise an issue using the same portal where the analysis was carried out, it simplifies the management of quality control issues. The main advantages of the quality control web application are:
- Raise an issue as soon as it is identified, without leaving the data visualisation and analysis platform.
- Ability to associate issue data points with the issue. This allows another user to check the issue and immediately see the associated data points. In other words, this increases the specificity of an issue and therefore reduces the turn-around time by reducing the time that a user must invests to understand, discuss and resolve an issue.
- By associating chronologically ordered action items with an issue, the quality control web application allows a user to study the discussions and insights in the same portal. This means that a user can see the visualisation as they go through the discussion thread concerning the issue.
- Since the quality control web application captures all of the affected data contexts and specific data points within those contexts; and also the discussions and actions concerning an issue, it is possible to maintain the quality control history for future analysis. For instance, when reporting about the quality control aspects, it is possible to quantify the quality control exercise as a whole.
Selecting data points
To associate data points with an issue to be raised, the user must first select the issue data points. Data points can be selected using two methodologies:
- Select a single data point by clicking on the data point.
- Select a group of data points by using a box selector. To use the box selector, left-click on the visualisation and drag the mouse while the mouse button is still depressed. This will draw a rectangular box to mark the selection region, and all of the data points inside this region will be selected. When done, release the mouse button.
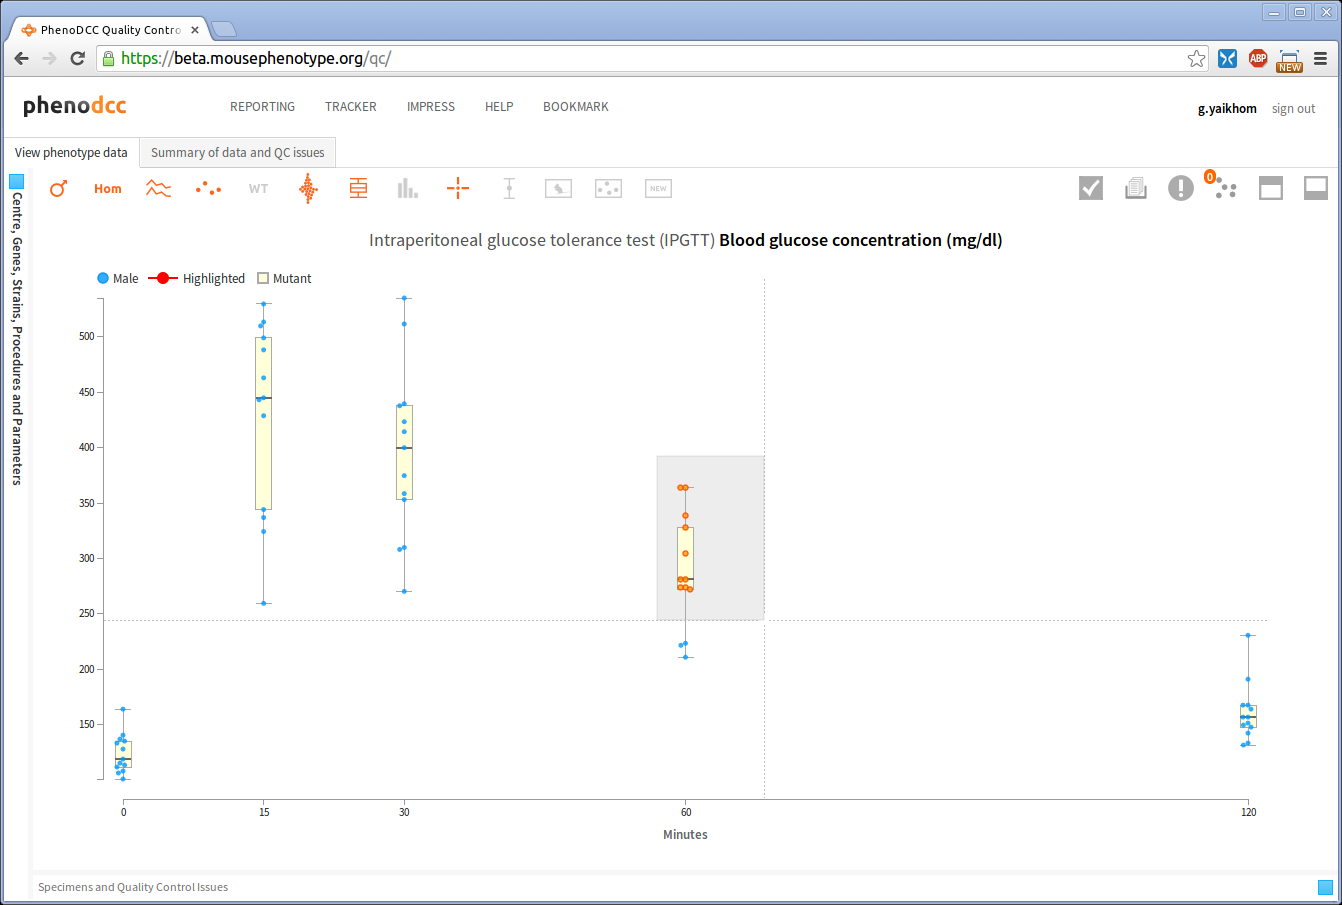
If the box selector region includes already selected data points, the existing selections will remain selected, as shown above.
It is possible to grow the selection of data points by specifying multiple box-selector regions.
Removing data points from a selection
There are various ways for removing data points from a selection.
- To remove all of the selected data points, click on the
 button.
- To remove a single data point, simply click on the selected data point. In fact, clicking on a data point toggles the selection state of the data point. In other words, clicking on a selected data point unselects the data point, whereas, clicking on an unselected data point selects the data point.
- To remove multiple data points from an existing selection, we
again use the box-selector. But first, we must switch the box-selector
mode from select mode to unselect mode. This is done by checking
the Highlight cited data points or selection control
 .
This will not only switch the selection
mode, but will also display only those data points that are
currently in the selection, making removal of data points easier.
Now, to remove a group of data points, we first left-click on the
visualisation and drag the mouse while the button is still
depressed. A rectangular box will become visible, which marks the
region to remove. Any data point inside this region will be marked
for removal. When done, release the button and all of the
data points within that region will be removed. The box selector
can be applied multiple times.
.
This will not only switch the selection
mode, but will also display only those data points that are
currently in the selection, making removal of data points easier.
Now, to remove a group of data points, we first left-click on the
visualisation and drag the mouse while the button is still
depressed. A rectangular box will become visible, which marks the
region to remove. Any data point inside this region will be marked
for removal. When done, release the button and all of the
data points within that region will be removed. The box selector
can be applied multiple times.
Raising issues using data points
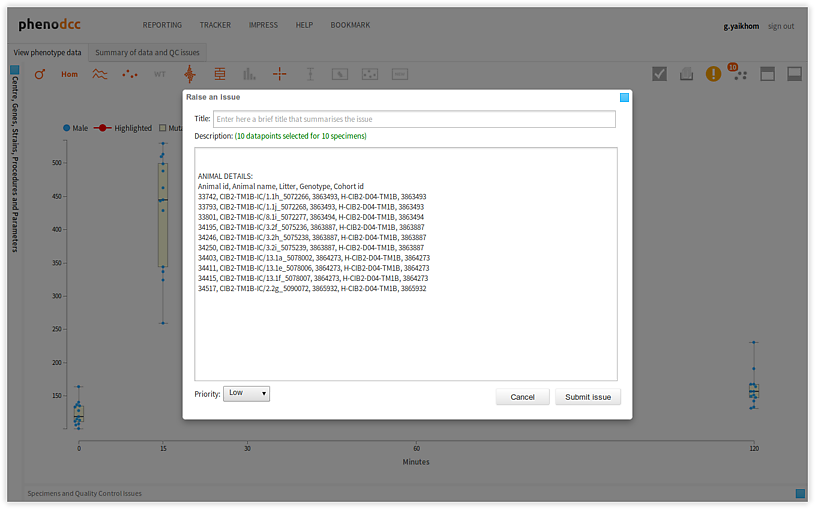
To raise an issue, simply click on the  button. This will pop-up a dialog box with
a form. After the form is filled, click on the Submit issue button to raise the issue, or, click
on the Cancel button to cancel raising the issue.
button. This will pop-up a dialog box with
a form. After the form is filled, click on the Submit issue button to raise the issue, or, click
on the Cancel button to cancel raising the issue.
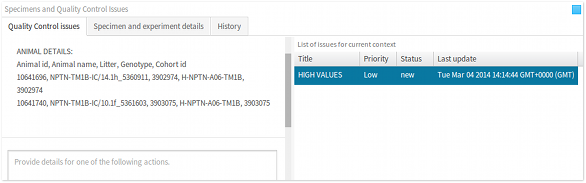
Browsing through issues
To browse through the list of issues that are associated with a given data context, activate the Quality Control issues tab-panel. All of the associated issues will be displayed in the List of issues for current context panel, as shown below. All of the actions associated with the highlighted issue will also be displayed in the Actions panel. Furthermore, the related issue data points will be highlighted in the visualisation.
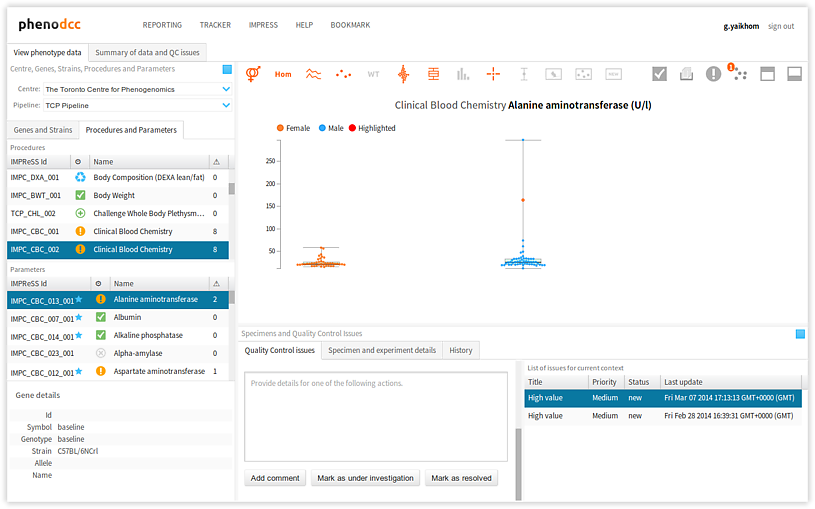
Selecting a different issue from the List of issues for current context panel updates the Actions panel, and also highlights the relevant issue data points in the visualisation.
The following are descriptions of the issue statuses:
- new – A new issue was raised.
- accepted – A user has accepted the issue and will try to resolve it.
- resolved – Issue has been resolved.
- dataadded – New measurements were added since issue was raised.
- dataremoved – Measurements were removed since issue was raised.
- datachanged – Measurements were updated since issue was raised.
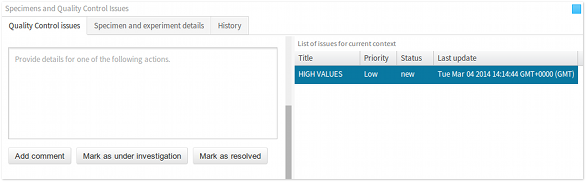
Commenting, accepting and resolving issues
To comment on an issue, scroll down the Actions panel. At the bottom of the panel, there will be a text box and three action buttons Add comment, Mark as under investigation and Mark as resolved.
To add a comment, fill in the details of your comment, and simply click the Add comment button. As soon as the comment is added, this will be displayed in the Actions panel.
![Actions that are applicable to an issue][issue_actions_for_issues]
To accept an issue for further investigation, and to acknowledge that a fix is currently being worked on, fill in the comments, if any, and click on the Mark as under investigation button.
Finally, to mark an issue as resolved, fill in the comments, if any, and click on the Mark as resolved button.
Mark a data context as QC done
After the data context has been examined and analysed for QC issues,
and once all of the pending issue have been resolved, the data context
must be marked as QC done. This means that all of the measurements
that correspond to the current data context have passed the quality
control checks. To mark a data context as QC done, click on the  button. If there are
pending QC issues, you must resolve these before you can mark a data
context as QC done. If there are no more unresolved issues, the data
context will be marked as QC done, and the parameter status will
refresh to reflect this.
button. If there are
pending QC issues, you must resolve these before you can mark a data
context as QC done. If there are no more unresolved issues, the data
context will be marked as QC done, and the parameter status will
refresh to reflect this.
If you wish to mark all of the parameters under a procedure as QC done,
click on the  button.
Progression of status
The status of the gene/strains, procedures and parameters propagate in the following manner:
- Gene/strain status depends on the status of the procedures,
- Procedure status depends on the status of its parameters.
If there are conflicting statuses, the following precedence rules are used to reflect the aggregate status. The higher the value, the higher the precedence.
- No data
- QC done
- Data added
- Data modified
- Data removed
- Has QC issues
For instance, if a procedure has three parameters A, B and C with the statuses 2 (QC done), 3 (Data added) and 6 (Has QC issues) respectively, then its status will reflect the highest status, i.e., 6 (Has QC issues).
Advanced usage
Initialising the web application
To initialise the PhenoDCC Quality Control web application using a specific data context, we pass the identifiers for centre, genotype, background strain, procedure and parameters. The first three identifiers are integer primary keys as recorded in the PhenoDCC database, whereas, the final two are IMPReSS string identifiers. For instance, if we wish to initialise the web application with the following data context:
- centre id (
cid): 4 - pipeline id (
lid): 7 - genotype id (
gid): 377 - strain id (
sid): 35 - IMPReSS procedure id (
peid): IMPC_IPG_001 - IMPReSS parameter id (
qeid): IMPC_IPG_001_001
then we append the following query string to the browser URL.
?cid=4&gid=377&sid=35&lid=7&peid=IMPC_IPG_001&qeid=IMPC_IPG_001_001
This will initialise the PhenoDCC Quality Control web application in the specified state. If invalid values were specified, the web application will ignore those values and choose the appropriate default values to ensure that the data context is valid.
Bookmarking
In fact, this facility to initialise the web application in a given state allows a user to bookmark a specific state for later referencing. Important usage include communicating the relevant state while discussing specific data remotely.
To bookmark the current state, click on the Bookmark link at the toolbar. This will display a complete link that can be copied and pasted as a normal text string, for communication in emails etc.
Video tutorials
The following are segments from the video tutorial for a few of the most common tasks.
- Selecting measurements to visualise
- Interacting with the visualisation
- Selective display of statistics
- Hiding wildtype measurements
- Filtering measurements by zygosity
- Filtering measurements by sex
- Display crosshair to get measurements for specific data points
- Retrieving specimen and experiment details
- Display history of data evolution and quality control activities
- Highlight data points that belong to a specimen
- Selecting data points to raise an issue
- Clearing a selection of data points
- Raising a quality control issue
- View details for a quality control issue
- Adding a comment to an issue
- Marking an issue as under investigation
- Resolving a quality control issue
- Displaying all of the issues that belong to a centre
- Marking a parameter as QC done
- Marking all of the parameters associated with a procedure as QC done
Understanding the icons
Data context status (gene/strain, procedure and parameter)
| The parameter is a required parameter. | |
| Data context has no measurements. | |
| Crawler added new measurements. In general, this happens when centres have exported data to the DCC. | |
| Crawler modified existing measurements. In general, this happens when centres have exported data to the DCC that modifies existing data. | |
| Crawler removed measurements. In general, this happens when centres remove data that was exported previously to the DCC. | |
| Data context was looked at by a Wrangler and did not find new issues. | |
| There are unresolved QC issues for this data context. | |
| New measurements were added for this parameter; and the parameter still has unresolved issues. | |
| Measurements were removed for this parameter; and the parameter still has unresolved issues. | |
| Measurements were modified for this parameter; and the parameter still has unresolved issues. | |
| Wrangler has looked at the measurements and did not find new issues; however, the parameter still has unresolved issues. | |
| Wrangler should look at the measurements again. Measurements have been updated since the last time the context was checked. | |
| Wrangler should look at the measurements again. The context also has unresolved issues. |
Data point details
| Homozygous male | Heterozygous male | Hemizygous male | |||
| Homozygous female | Heterozygous female | Unknown sex and zygosity | |||
| Homozygous (unknown sex) | Heterozygous (unknown sex) | ||||
| Male (unknown zygosity) | Female (unknown zygosity) |
Visualisation control icons
| Include or exclude data points by sex. | |
| Only include datapoints for male specimens. | |
| Only include datapoints for female specimens. | |
| Include or exclude datapoints by zygosity. | |
| Only include datapoints for homozygous specimens. | |
| Only include datapoints for heterozygous specimens. | |
| Only include datapoints for hemizygous specimens. | |
| Show or hide polylines on series plots. | |
| Show or hide data points. | |
| Include or exclude wildtype datapoints. | |
| Enable or disable display of scatter data using Beeswarm plot. | |
| Show or hide box and whisker plots. | |
| Extend whiskers to 1.5 x Inter-Quartile Range. If disabled, the whiskers are extended to the extremas. | |
| Show or hide descriptive statistics. | |
| Show or hide 1st and 3rd quartiles. | |
| Show or hide minimum value | |
| Show or hide maximum value | |
| Show or hide mean | |
| Show or hide median | |
| Show or hide cross hair. | |
| Show or hide standard deviation bars. | |
| Show or hide standard error bars. | |
| Highlight data points that correspond to the selected mouse specimen. | |
| Highlight selected data points; or highlight cited data points when issues are selected. | |
| Display new datapoints added since the last time a Wrangler viewed the measurements (i.e., marked the context as ‘QC done’). |
Issue management controls
| Mark data context as QC done. | |
| Mark all parameters of the current procedure as QC done. | |
| Raise an issue using selected data points. | |
| Clear the cited data points or selection. This icon also displays the number of datapoints currently selected. | |
| Maximise the visualisation. | |
| Minimise the visualisation. |
The activity timeline
| Crawler added new measurements. | |
| Crawler modified existing measurements. | |
| Crawler removed measurements. | |
| User marked data context as QC done. | |
| User raised a quality control issue. | |
| User commented on quality control issue. | |
| User has accepted the issue and is working on a fix. | |
| User has resolved a quality control issue. |
Copyright (c) 2019 The International Mouse Phenotyping Consortium